
How to access, use, edit, create, convert, import, and download Photoshop Shapes
Rob Schultz ![]()
Today’s Best Tech Deals
Picked by PCWorld’s Editors
Top Deals On Great Products
Picked by Techconnect’s Editors
Show More
Photoshop Shapes are vector images that you can size up or down without degrading the image quality. The best thing about using Shapes is that it saves you time. For example, few people can draw a perfect circle (especially with a mouse). If you click, drag, and draw a vector image, as opposed to drawing them by hand with one of the pen tools, you can draw a Custom Shape in mere seconds.
You start by selecting the Shapes tool. The default is the rectangle shape, so look for a square on the toolbar, (currently seventh icon from the bottom between the Path Selection and the Hand tool). You can choose from the Rectangle, Rounded Rectangle, Ellipse, Polygon, Line, or Custom Shape tools.
Photoshop custom shapes
Photoshop provides several libraries of custom shapes. These are not the same as your personal custom shapes, which you can create with the Pen tool yourself. These are also, not the same as the many thousands of custom shapes available to download from the Internet. Photoshop Shapes have a .csh extension, so look for files that end with this format.
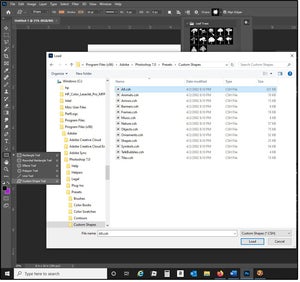
The Custom Shape tool has a library of vector shapes to get you started: Leaf Trees, Wild Animals, Boats, and Flowers. If you have any previous versions of Photoshop on your computer, you can import all the shapes from those Shape collections and multiply your library. Click the gear icon (top right corner of the Shape submenu, then navigate to the Adobe> Photoshop> Presets> Custom Shapes folder.
Select All from the list of files and click the Load button. The All file includes 12 more categories of shapes: Animals, Arrows, Banners, Frames, Music, Nature, Objects, Ornaments, Shapes, Symbols, Talk Bubbles, and Tiles. If you don’t want or need access to all of these Shapes, just import or load the individual files that apply.
 JD Sartain / IDG
Select Shapes to drag draw vector images
How to use and edit Photoshop Shapes
To locate and use Photoshop Shapes, choose the Shapes tool from the main toolbar, right-click to see the submenu, then cursor down to the shape you want to use. Notice that the menu across the top changes based on which shape you choose. For example, if you select the Polygon, choose the number of sides you want from the Sides field box (top, far right). Or, if you choose the Custom Shape tool, the Shapes dropdown (also top, far right) displays dozens of vector options.
The top menu also displays the Fill, Stroke, Width, Height, and Shape editing options (such as Combine Shapes, Intersect Shapes, etc.), Alignment options, Stack Layers options (such as Bring to Front, Send to Back, etc.), the Path options (under the Gear icon), and last, the Align Edges feature, which aligns vector shape edges to the pixel grid. Experiment with these features to change or enhance your Photoshop shapes.
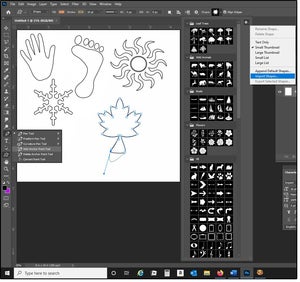
Notice that when a shape is selected, the box handles (called anchor points) appear in multiple locations around and throughout the shape. Use these points to edit or re-draw the shape. For example, click the anchor point on the right side of the leaf stem and drag the handle down and to the right. Repeat the process on the left side of the leaf stem.
When you click one of the anchor points, a line with the dots on each end (called Direction Points) appears. Click one of these points, then use your cursor to drag and slide the line around until the stem is reshaped to your satisfaction. If you need to edit the image more, you can easily add more anchor points with the Pen tool (or delete them).
 JD Sartain / IDG
How to draw edit a vector Shape with Anchor Points
How to create custom Photoshop Shapes
Even if you can’t draw, you can trace an image, right? That’s how easy it is to create your own vector Shapes in Photoshop. First, download a free, public domain coloring book image from the Internet, such as from Super Coloring. Then try this:
1. Go to page 3 (page numbers at bottom of each screen page), scroll down (or page down) four times, then double-click (select) the Christmas tree.
2. Right-click the image, then choose Save Image As…
3. Navigate to your Pictures folder and save the file (simple-christmas-tree-coloring-page.png appears in the File Name field box).
4. Open the file in Photoshop.
5. Select Image> Image Size (or Alt + Ctrl + i (simultaneously).
6. The current size is 4.7 inches wide by 6.6 inches tall, with a resolution of 72 pixels per inch. Change the pixels per inch to 300. It might blur a bit, but that’s okay. We’re going to re-draw this picture using the Pen tool and anchor points, so it becomes a vector image.
IMPORTANT NOTE: Always use, create, or convert your work to a minimum resolution of 300 pixels per inch before you make any edits or modifications. You can always reduce the image size or resolution with minimum to zero image quality. You cannot, however, enlarge a low-resolution image without degrading quality.
7. Save the file with the new image size settings.
8. Use the Magic Wand tool and click anywhere on the background (make sure the entire background is selected).
9. Choose Select> Inverse (or Shift- Ctrl+ i) to re-select the tree, then choose Edit> Copy (or Ctrl+ C).
10. Open a new Photoshop file: 8x10x 300 ppi and select Edit> Paste. Now that we have the vector image, the original is no longer needed.
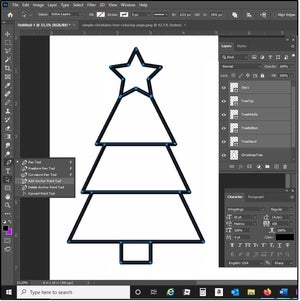
11. Select the Pen tool from the Tools palette (near the bottom). For this beginner’s exercise, it’s a plus that the image lines are thick.
12. Begin with the star. Click the top point of the star, and an anchor point appears. Click the next star point, and another anchor point appears (connected to the first one). Continue around the perimeter of the star, then close the vector by clicking the first, original anchor pint again.
13. Choose Edit> Define Custom Shape, then type in a name for your shape and click OK.
14. Select the Pen tool again and click each corner of the first tree section.
15. Choose Edit> Define Custom Shape again. Name the shape TreeTop and click OK.
16. Repeat this process for the middle and bottom tree sections, and then again for the tree stand.
NOTE: Each time you create a new vector be sure you have Layer1 selected, the full Christmas Tree layer. Each time a new vector is defined, a new layer appears in the Layers panel. Name those layers the same thing as the Shapes.
 JD Sartain / IDG
How to create custom Photoshop Shapes
How to draw, reshape, and add color or patterns to Photoshop Shapes
1. Once all the shapes are defined, you can use these vector shapes over and over again.
2. Open a new Photoshop file size 8x10x 300 ppi.
3. Select the Shape tool, then the Custom Shape tool.
4. Go to the Shape Library field box on the submenu and click the down arrow on the right.
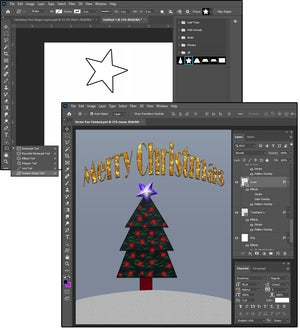
5. Scroll to the bottom of the dropdown menu and select your vector star.
6. Place your cursor in the top-left corner and drag down and over until the star becomes the size and shape you like.
7. While the star is still selected—in the Layers panel—right-click your vector image.
8. Select Blending Options from the submenu.
9. In the Layer Style dialog, click the word Stroke (clicking the box alone will not be enough).
10. On the Stroke panel, choose size “6” pixels for the stroke width. Position=Outside; Blend Mode=Normal; Opacity=100%; File Type=Color; Color=Black; and click OK. Your star now has an outline. Without this line, the star would appear invisible on the page.
11. Now, right-click the Star1 layer again, select Blending Options> Patterns. Scroll through the Patterns library and choose one that looks like a star.
12. Repeat steps 1 through 11 to drag and draw the remaining layers, plus add an outline and a pattern fill.
13. Add some color or a gradient to the background and it’s finished (or sort of). The result is a simple, child-like picture of a Christmas tree with a star on top. But now you know how to create your own custom shapes.
14. Save the file with a name (we’ll use Star1) and create another custom shape.
 JD Sartain / IDG
How to draw reshape edit and fill custom Shapes
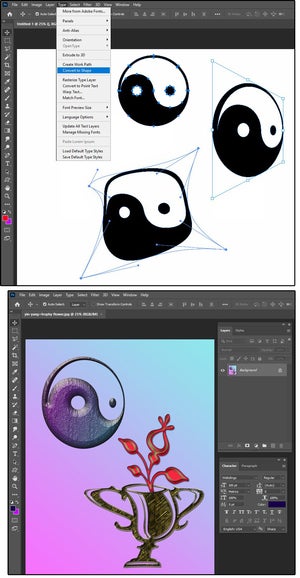
Convert fonts, wingdings, webdings, and other symbol bullets into Photoshop Shapes
In the older versions of Photoshop, converting fonts and other symbols was not so easy. In the CS versions, it’s a piece of cake.
1. Open a new file and ensure that the Character/Paragraph panel is displayed on the screen.
2. Change the font to Wingdings and the size to 300 points.
3. Select the Text tool and drag out a text box.
4. Enter the left square bracket, and a yin/yang symbol appears on the screen.
5. Choose Type> Convert to Shape.
6. Select the Path Selection tool (black arrow on toolbar), and several dozen anchor points appear on and around the yin/yang symbol.
This symbol is now a vector image that you can size, distort, rotate, skew, warp; change the perspective, the color; add loads of effects such as Bevel, Emboss, Contouring, 3D; plus add texture, gradients, patterns, shadows, glow, and so much more. The options are endless, because there are thousands of symbol bullet fonts available on the Internet.
 JD Sartain / IDG
How to convert bullets and symbols to vector Shapes
Find free Photoshop Shapes and symbol bullets
Any site that has fonts (and there are dozens of them) will have symbol bullets. For example try any of these:
1001 Free Fonts
DaFont
Fontspace
1001 Fonts
Urbanfonts
Look for categories called Symbols, Bullets, Decorative, Wingdings, or Ornaments.
To download Photoshop Shapes, try any of these:
Brusheezy
Shapes4free
Inspirationfeed
Template Monster
The Ultimate Collection of Custom Photoshop Shapes
Or just do what I do: Search online for “free Photoshop Shapes” or “free fonts.” Then experiment, play, and have fun!
Note: When you purchase something after clicking links in our articles, we may earn a small commission. Read our affiliate link policy for more details.
JD Sartain is a technology journalist from Boston. She writes the Max Productivity column for PCWorld, a monthly column for CIO, and regular feature articles for Network World.