
Is your Windows PC too slow? Give your PC a free performance boost.
Peshkov/iStock 
Today’s Best Tech Deals
Picked by PCWorld’s Editors
Top Deals On Great Products
Picked by Techconnect’s Editors
Show More
It’s a common complaint: My Windows PC is running slow. Annoyingly slow. You can add RAM, or buy a faster SSD, but that costs money. No, your first order of business should be an attempt to wring free performance from Windows. In the following nine steps we show you how to speed up your Windows 10 PC without spending a dime.
Be warned: There could be trade-offs. More speed could mean less battery life in the case of a laptop, or you may have to give up a beloved program that’s bogging things down. You’ll have to decide what sacrifices you’re willing to make in order to make your Windows PC faster.
1. Give it the reboot
If your PC is behaving horribly slow, try rebooting. Yes, it’s an obvious solution, but people tend to forget the obvious.
The sleep or hibernate setting will save power, but only a full reboot clears out the cobwebs in Windows’ brain and gives it a fresh start. Do it every day if the PC is really slow.
2. Turn on high performance via the power slider
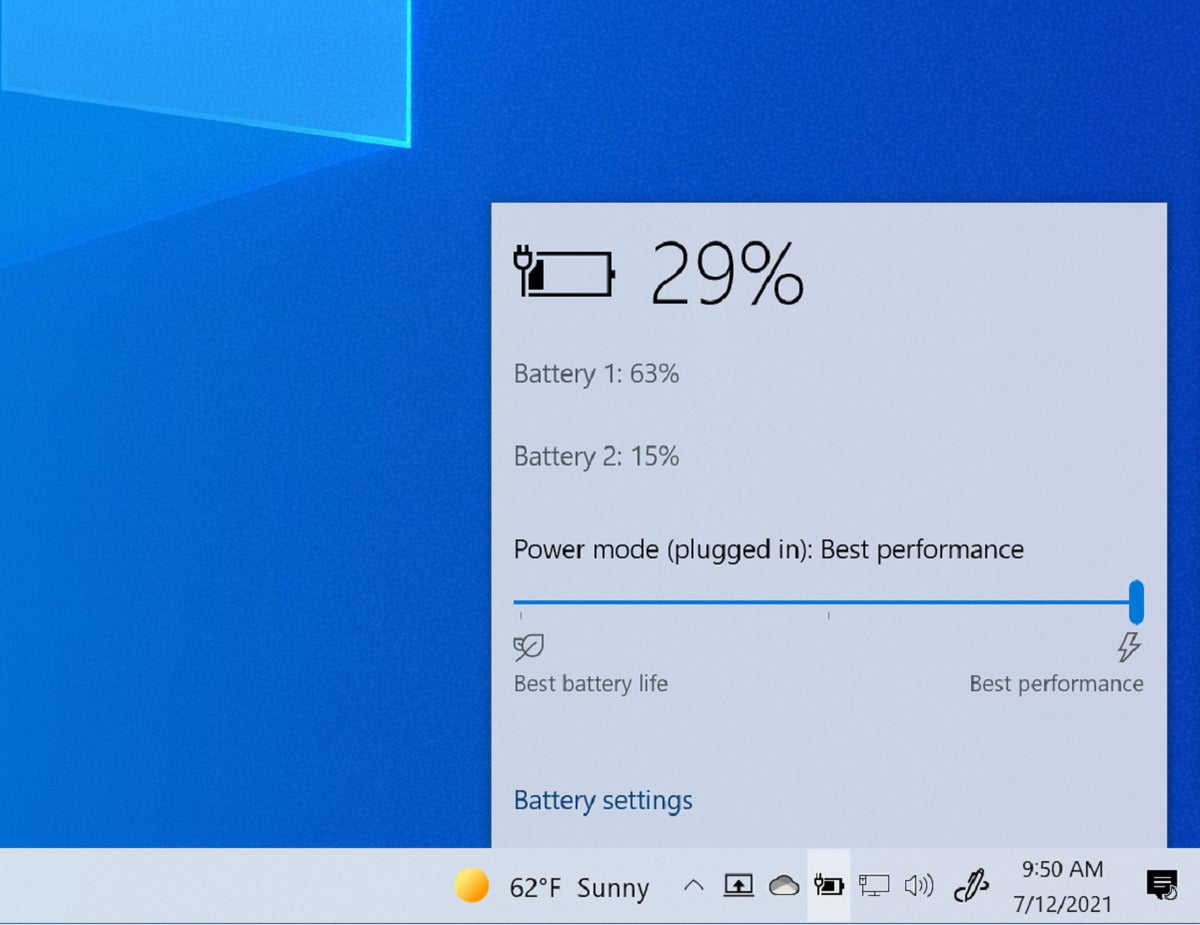
Windows assumes you want an energy-efficient computer. But you can trade electricity for speed. This tip depends upon whether your PC enables it: The so-called Windows “power slider” is nearly ubiquitous on laptops, less so on desktops. It puts the PC in a high-performance mode, which in a laptop means increased performance for gaming, say–at the expense of battery life.
Previously you had to use the Control Panel to do this, but now you can do it right from the Windows 10 Taskbar. Right-click the battery icon, and adjust the power/performance slider all the way to the right. Note: Windows considers your PC while plugged in, and when running on battery power, as two separate states. You’ll typically need to adjust the power/performance slider while plugged in, and then adjust it again while unplugged and running on battery.
 Mark Hachman / IDG
You can access the Windows 10 power/performance slider by clicking the battery icon in the taskbar.
While plugged in, there’s really no penalty for pushing your PC into performance mode, though it will consume a bit more power and the fans may be louder. (The exception is Microsoft’s Surface Book 2, which consumed too much power while gaming for its power brick to handle. Microsoft solved that problem with the Surface Book 3, which included a charger capable of higher-power output. SB2 owners can also buy the SB3’s charger, separately.)
3. Undo some appearance options
 Lincoln Spector
 You can speed up Windows by turning off some of its special effects
Windows works hard to make the screen easy on the eyes. If your PC is underpowered, you may want to sacrifice aesthetics and gain some speed.
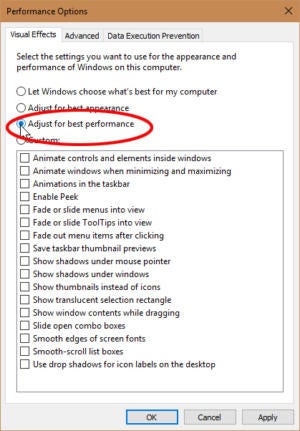
Right-click Start, and select System. In the resulting Control Panel window’s left pane, select Advanced system settings.
This brings up the System Properties dialog box, already on the Advanced tab. Click the Settings button in the Performance box (the first of three “Settings” buttons on this tab).
This brings up another dialog box. You can uncheck some of the options, or simply select Adjust for best performance.
4. Remove unneeded autoloaders
A lot of programs want to load automatically every time you boot. Each one slows down the boot process, and some continue to slow down Windows afterwards.
These are not all bad. Your antivirus program should load when you boot and keep running as long as your PC is on. Other programs that need to run in the background to work, such as OneDrive, should also autoload.
But some programs—even good ones that you use frequently—don’t really need to run all the time. You don’t want to uninstall those, but you may want to stop them from autoloading. We previously reported on an issue with Epic’s game store that quietly ate into your battery life. (That issue has since been fixed with a patch.) Still, the fewer services competing for your PC’s resources, the faster it will run.
 Lincoln Spector
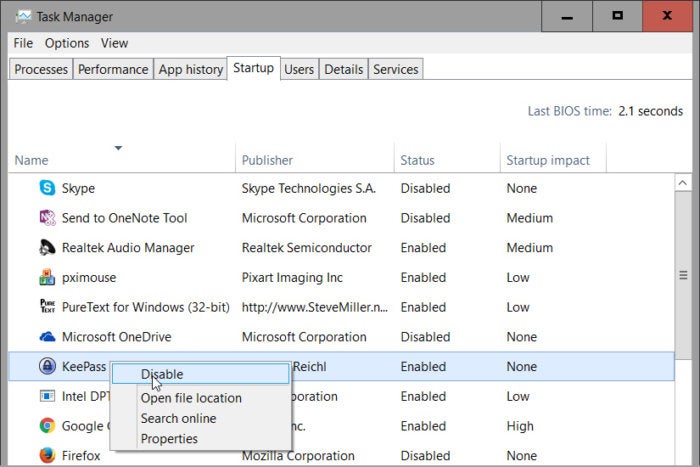
The Task Manager can show you all the programs that load automatically at boot, and help you choose which ones to keep.
To see how bad the situation is, right-click the taskbar and select Task Manager. Click the Startup tab. (If you don’t see any tabs at the top of the window, click More details in the lower-left corner.)
The Startup tab will show you all the autoloading programs. As you examine the list, think about what programs don’t really need to keep running at all times. To stop one from loading automatically, right-click its entry on the Startup tab and select Disable.
If you don’t recognize the name of an autoloader, right-click it and select Search online to help you find more information.
5. Stop resource-hogging processes
Your computer may be running a poorly written process that’s hogging a lot of resources. To find out, right-click the taskbar and select Task Manager. (Once again, if you don’t see any tabs at the top of the window, click More Details.)
 Lincoln Spector
The Task Manager can also tell you what programs and processes are hogging your resources.
On the Processes tab, click the CPU column header to sort by processor usage. The top items will be the ones hogging the CPU. (If the top processes are all using 0%, the processes are sorted in the wrong direction. Click the column header again.)
Don’t assume that the top process is necessarily a hog. Some big applications are worth the CPU cycles. One way to manage these programs is to close them when you’re done with them. Another is to switch to a smaller program. Be careful when closing processes! Some may be critical to Windows, or may accidentally close a program you’re working in.
You can close a process from inside Task Manager. Select the process and click the End task button and confirm your decision. Be wary if Windows warns you that a process is critical to Windows.
When you’re done, click the Memory column header and repeat.
6. Turn off search indexing
When you search for a word across all the files in your Documents library, the results come up almost immediately. That’s wonderful, but it comes at a price. When you’re not searching, the indexing needed to create those fast searches slows you down.
To turn off all indexing:
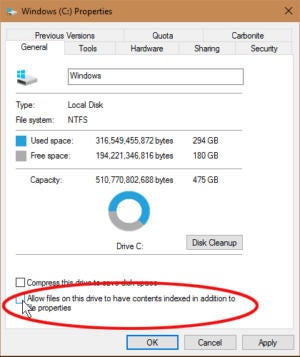
1. Open Windows Explorer, right-click your C: drive, and select Properties.
2. On the General tab, uncheck Allow files on this drive to have contents indexed in addition to file properties.
3. In the resulting warning box, select Apply changes to drive C:, subfolders and files.
 Lincoln Spector
You can easily turn off all indexing to speed up everything except searches.
Windows may take some time turning off the indexing. Get up and take a walk; it’s good for you.
There’s another option that will let you turn off some indexing but not all of it:
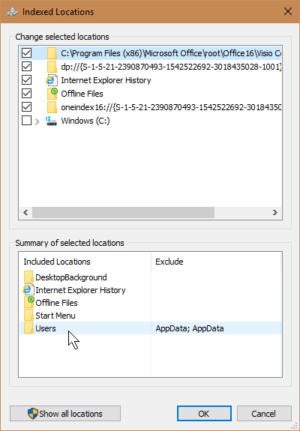
Type indexing in the Cortana field. Select Indexing Options. Click the Modify button near the lower-left side of the resulting dialog box.
This brings up another dialog box, with two sections. And yes, it’s confusing. Start in the bottom section of the dialog box, Summary of selected locations. Click any of these options, and it changes the contents of the top section, Change selected locations.
 Lincoln Spector
You can also select what to and not to index, although this can be confusing.
Unchecking items in that top section will stop indexing in those specific locations. Note that if these boxes are unchecked, checking them will turn on indexing. If your searches accelerate as a result, you might consider this to be a good thing.
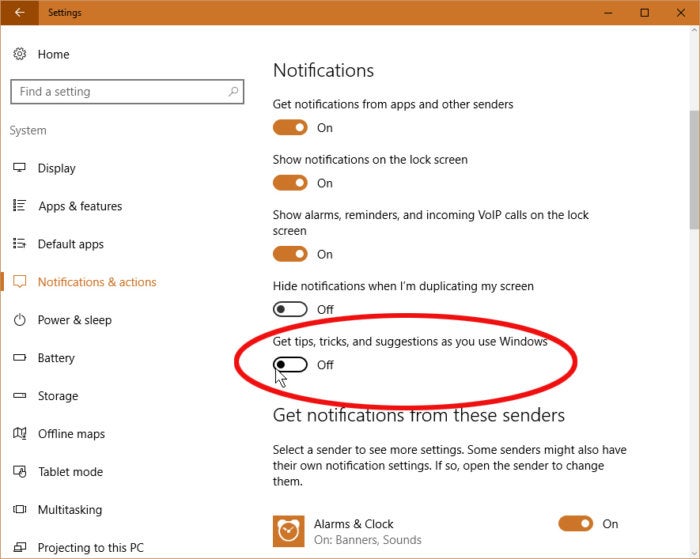
7. Turn off Windows tips
Windows 10 occasionally gives you tips about how you can better use the operating system. The problem is that, in order to see what tips you need, it keeps an eye on how you’re using your PC.
Yes, that sounds worrisome as a privacy issue, but it also slows down your PC.
To turn it off, click Start> Settings. Select System, then select Notifications & actions in the left pane.
At the bottom of the Notifications section, turn off Get tips, tricks, and suggestions as you use Windows.
 Lincoln Spector
Windows Tips can help you learn to better use your PC, but they can also slow you down.
You might also want to explore the other notification options, and turn some of them off, as well. I don’t think any of the others slow down the PC, but they can get annoying.
8. Clean your internal drive
If your internal storage is almost full—whether it’s a hard drive or an SSD—that could be slowing you down. But if your drive has plenty of free room, skip this section.
 Lincoln Spector
Windows’ Disk Cleanup tool and free up space on your drive, and thus maybe speed up your PC.
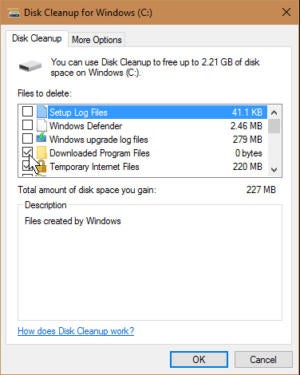
Start with Windows’ own Disk Cleanup tool. In the Taskbar search box, type disk and select Disk Cleanup.
Wait while Disk Cleanup examines your drive. Click the Clean up system files button (this time you’ll need an administrator password). Then wait again for another examination.
Examine the options. If you find one called Previous Windows installation(s), you’re in luck. By checking it and clicking OK, you’ll free up a lot of space. You can check other items to get rid of them, as well.
Something else you might want to consider: Uninstall programs you no longer use.
9. Check for malware
I doubt an infection is intentionally slowing down your PC. There’s no illegal profits from that. Plus it’s a sure-fire way to trigger a victim’s suspicions.
But some malicious code could be slowing down your PC, even if that wasn’t the criminal’s intention. So if you’re suspicious, read Eric Geier and Josh Norem’s guide on how to remove malware from your Windows PC.
If after performing these tips, your PC still feels sluggish, it might be time to upgrade your hardware. Start here, with PCWorld’s recommendations of killer, but shockingly cheap PC upgrades.
Note: When you purchase something after clicking links in our articles, we may earn a small commission. Read our affiliate link policy for more details.
In addition to technology, freelance journalist (and sometimes humorist) Lincoln Spector is a passionate cinephile who writes the Bayflicks.net movie blog.