
Want to upgrade to Windows 11’s beta? Try out unreleased Windows 10 features? Here’s how to become a Windows Insider, and what you should know beforehand.
Today’s Best Tech Deals
Picked by PCWorld’s Editors
Top Deals On Great Products
Picked by Techconnect’s Editors
Becoming a Window Insider used to be a major hassle, reserved only for Microsoft’s biggest fans and most dedicated developers. But as we look forward to the launch of the first beta builds of Windows 11, it’s a much simpler process.
If you’ve been curious about becoming a Windows Insider with the intent of trying out Windows 11, look no further. Here’s what you need to know about the program, and how to join when ready.
What you need to become a Windows Insider
To become a Windows 10 Insider, all you need is a Microsoft account and a PC running Windows 10. We’re assuming you’ve already upgraded to Windows 10, though you can upgrade to Windows 10 for free if you haven’t already.
You’ll want to create recovery media (for Windows 7) or a USB recovery key (for Windows 8) before getting started. Assuming you’re running Windows 10, you should first create a restore point that you can go back to if things go wrong. And no matter what operating system you’re on, it’s a good idea to back up any important data before you take the plunge. Worst case scenario, you may have to reinstall Windows from scratch.
Be safe. Windows Insider builds should not be run on production or mission-critical PCs. Expect bugs! Blue screens of death (BSODs) are unlikely, but possible.
A few more disclaimers, coming straight from Microsoft: Only join the preview program if you don’t mind lots of updates and sudden changes, are comfortable with troubleshooting, can handle backing up and restoring an operating system, and know what an ISO is and how to use it. Microsoft also recommends only installing the preview on a PC that isn’t your daily driver.
Realistically, we’re all just playing a bit of CYA here. Windows 10 insider builds shouldn’t wreak much havoc on your PC, especially for the more stable preview options that Microsoft offers (more on that shortly), and switching back to the main version Windows 10 is pretty easy. But as always, it pays to be prepared.
How to install Windows Insider builds
With all that in mind, let’s get started. You don’t need to visit a separate Web site to join the Windows Insider program. Instead, you can do it all within Windows 10. Go to the Windows 10 Settings menu, then on to Update & Security> Windows Insider Program. Click the Get Started button. You’ll need a Windows account to sign up as an Insider, however, as a local account won’t work.
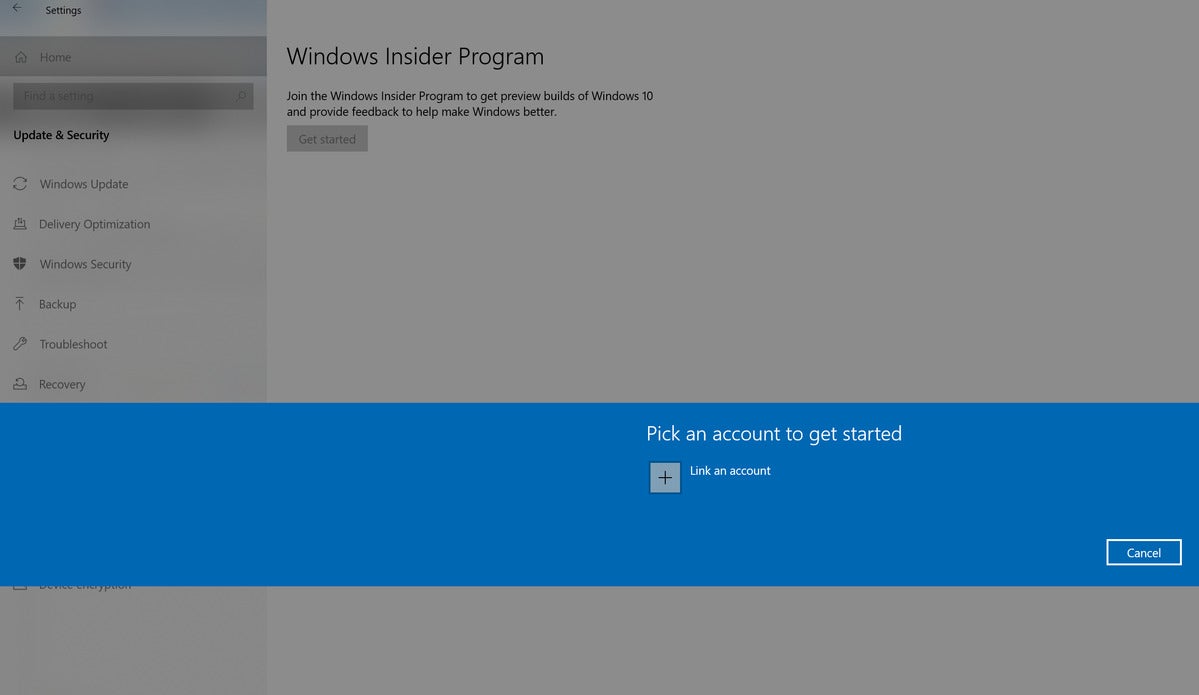 Mark Hachman / IDG
Head to the Windows 10 Settings> Update & Security> Windows Insider Program to get started.
For here, proceed through the following steps. Don’t worry if the process isn’t exactly as we describe it, as Microsoft adjusts Windows all the time.
- One last warning: If you haven’t backed up your important files, now’s the time.
- Observe any of Microsoft’s final attempts at frightening disclaimers, which we’ve covered above.
- Restart your computer.
 Mark Hachman / IDG
You’ll have the option of selecting a “ring” to receive Windows Insider builds.
Choose a Windows Insider channel
Once you’ve hopped on board the Windows Insider program, you can choose from three levels of preview builds, ranging from the most stable with the fewest new features, to the least stable with lots of rapid changes. You’ll need to be on the Dev Channel to receive Windows 11. Also, make sure that your PC meets the Windows 11 hardware specifications if you’re joining an Insider channel specifically to get Windows 11.
Here’s how Microsoft describes the different channels:
- Release Preview: Ideal if you want to preview fixes and certain key features, plus get optional access to the next version of Windows 10 before it’s generally available to the world. This channel is also recommended for commercial users.
- Beta Channel (Recommended): Ideal for early adopters. These Windows 11 builds will be more reliable than builds from our Dev Channel, with updates validated by Microsoft. Your feedback has the greatest impact here.
- Dev Channel: Ideal for highly technical users. Be the first to access the latest Windows 11 builds earliest in the development cycle with the newest code. There will be some rough edges and low stability.
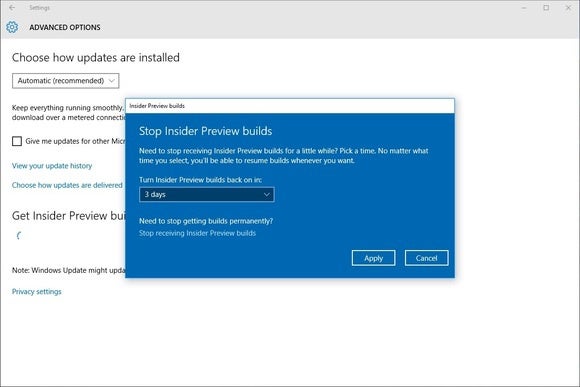
Note that by default, you’re signed up for the Beta Channel, but you can switch channels at any time. Just head to the Windows Update menu in Windows Settings, select Advanced Options, and adjust the slider near the bottom of the screen. In practice, though, it’s more difficult to go back to more stable channels like Release Preview if you’re on the Dev Channel, as Windows thinks that you’re trying to revert to a lesser, more insecure build.
In this case, you may need to visit Microsoft’s page, and download an ISO file for another channel. Download it, right-click the file, and then select Mount or Run to load the new OS.
Stop the train, I want to get off
Want to get back to the main, stable version of Windows 10? That’s easy, or at least it’s supposed to be. Return to Settings> Update & Security> Windows Update, then select Advanced Options. You’ll see an option for Stop Insider Preview Builds.
A pop-up window will appear, with an option to turn Insider Preview builds back on in one, three, or five days. Alternatively, you can click Stop receiving Insider Preview builds to remain on the main version of Windows indefinitely.
As Microsoft itself warns, this method may not work in all cases, which is why it’s a good idea to set a restore point beforehand. If all else fails, you can reinstall Windows 10 from scratch, and hopefully transfer all the precious you dutifully backed up earlier.
Note: When you purchase something after clicking links in our articles, we may earn a small commission. Read our affiliate link policy for more details.